Home Recording Starter Guide: Your First Track
The honest minimum chain to record at home - interface, mic, headphones and a free DAW - plus where to spend, what to skip, and the first-session traps to dodge.
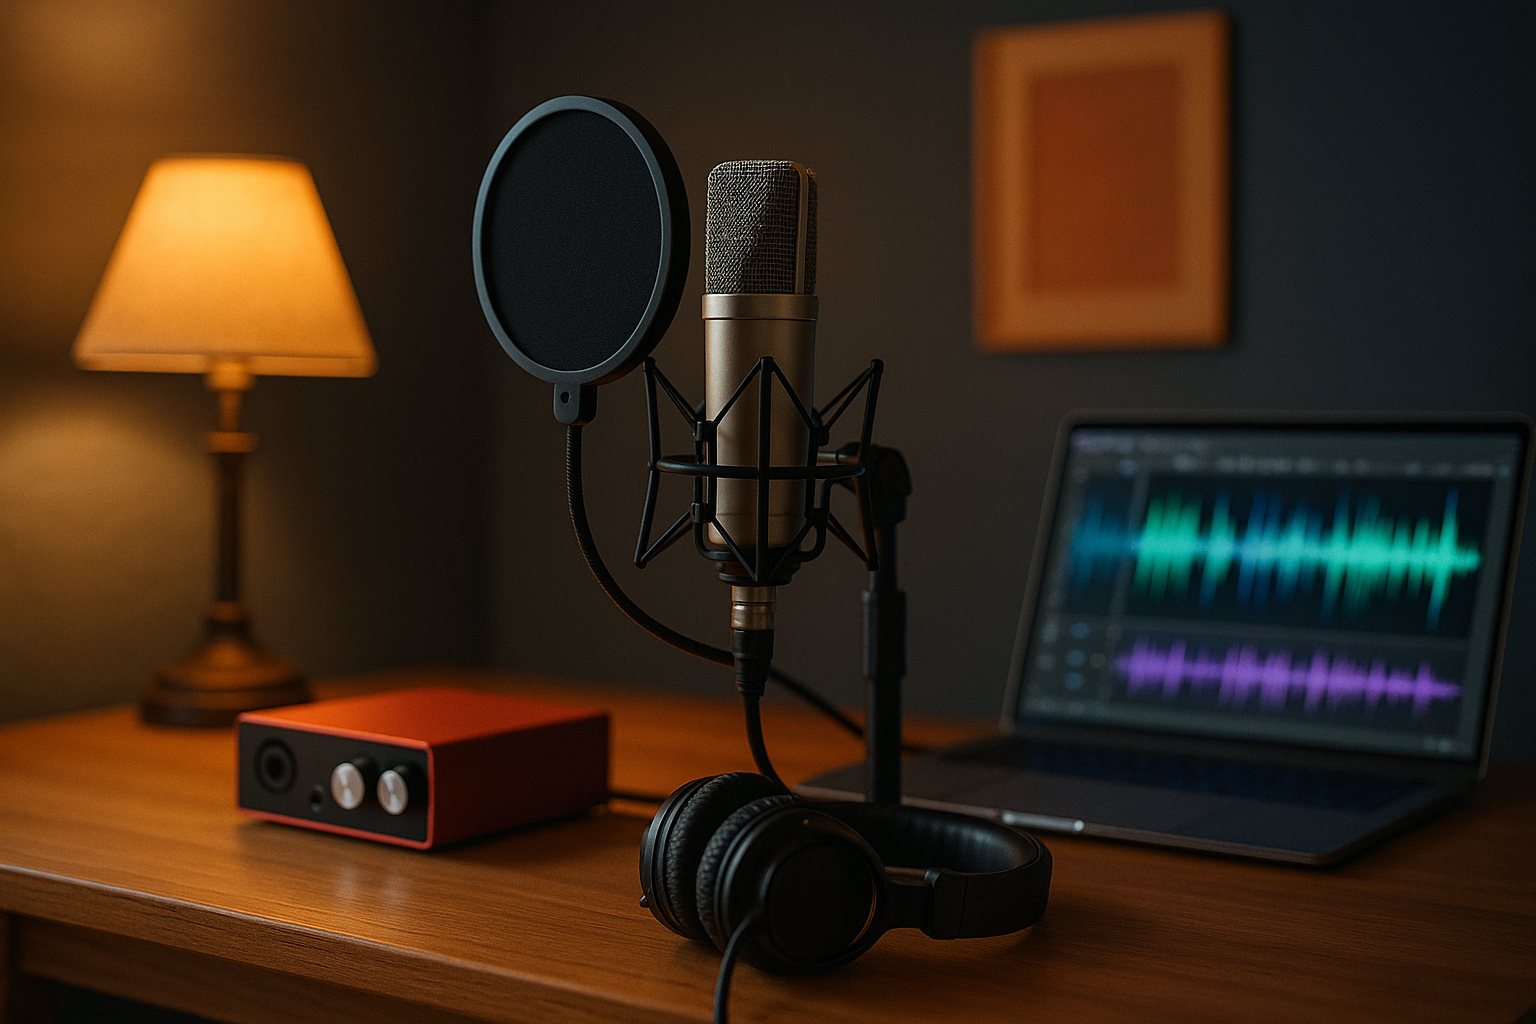
You don't need a studio to make a real recording. You need four things that talk to each other - an interface, a microphone, a set of headphones, and software to capture it - and a quiet-ish room to point them at. Get that chain right and your first track will sound miles better than a thousand dollars spent on the wrong box.
This guide is for songwriters and producers cutting their first proper recordings at home. We sell and use this gear at the Footscray shop every week, so we'll tell you where the money actually matters, where it doesn't, and how to avoid the mistakes nearly everyone makes on session one.
The minimum chain that actually works
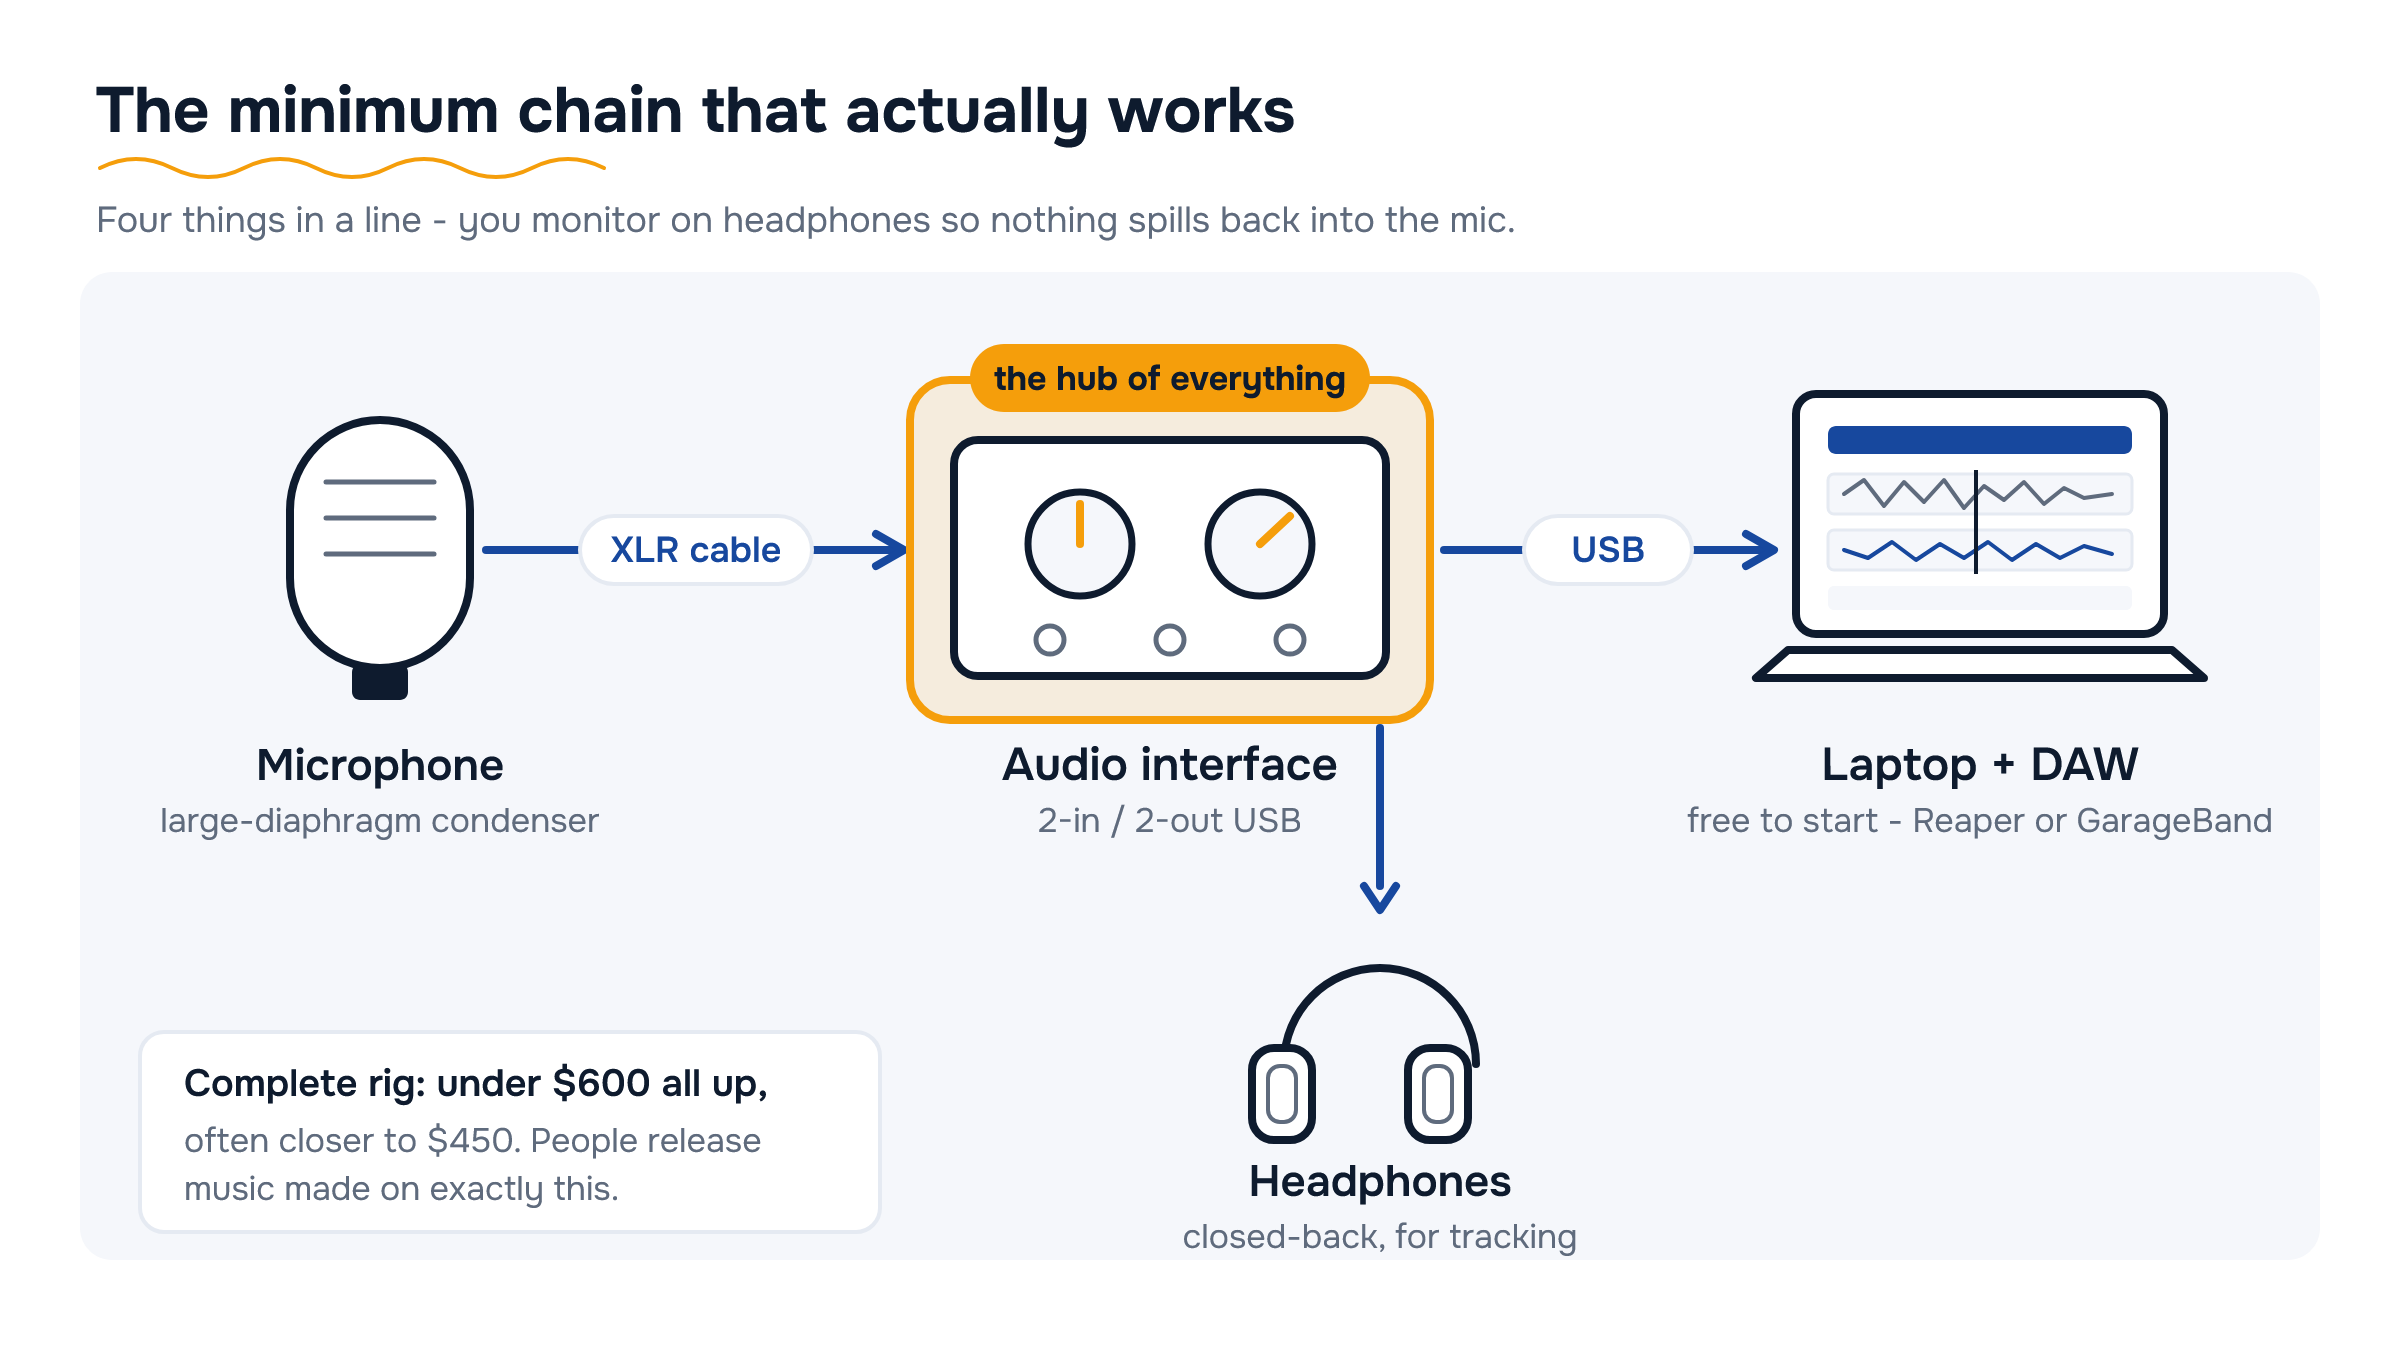
Strip recording back to its bones and you need exactly four things in a line: a signal goes into a microphone, the mic plugs into an audio interface, the interface connects to your computer over USB, and a free DAW (digital audio workstation) records it. You monitor the whole lot on headphones so nothing spills back into the mic.
Here's the honest budget. A solid 2-in/2-out USB interface, a single large-diaphragm condenser, a pair of closed-back headphones and an XLR cable will land you a complete, genuinely usable rig for under $600 all up - often closer to $450. That's not a toy setup. People release music made on exactly this.
- Interface - the heart of the rig; converts your mic and instrument into clean digital audio. Browse audio interfaces.
- Microphone - one good condenser does vocals and acoustic guitar. See studio microphones.
- Headphones - closed-back, for tracking without bleed. Shop headphones.
- DAW - free to start; most interfaces bundle a cut-down version, and Reaper, GarageBand, Cakewalk and Tracktion cost nothing.
Don't overthink the first buy. The gear above will outlast your first hundred songs.
Interface inputs and outputs - how many you actually need
Interfaces are sold by their I/O count - "2-in/2-out", "4x4", and so on. The number that matters is how many things you record at the same instant, not how many you own.
If you're a songwriter overdubbing - vocal, then guitar, then a tambourine, one at a time - a 2-in/2-out interface is all you'll ever need, and it's the sweet spot for value. Two inputs lets you mic a guitar and sing at once, or run a stereo pair.
- Recording a kit or a full band live? Then you need a channel per source - look at 8-in interfaces or one with ADAT expansion.
- Check the mic preamps - you want clean gain and 48V phantom power on every XLR input (condensers need it to work).
- Look for a combo (XLR + 1/4 inch) input so you can plug in either a mic or a guitar/bass DI.
- Outputs - two for a stereo pair of monitors later, plus a dedicated headphone jack with its own volume.
- Direct monitoring - a hardware mix knob that lets you hear yourself with zero latency. This is the feature that makes tracking feel right.
Buy for the session you actually do most weeks, not the band you might one day have. A 2x2 leaves more budget for the mic and the room - which is where the sound really comes from.
Condenser mic plus a quiet room beats an expensive mic in a bad one
This is the single most useful thing we can tell a first-timer: the room is part of the microphone. A large-diaphragm condenser in a quiet, soft-furnished room will run rings around a pricey mic recording in a tiled, echoey kitchen. The mic hears the room as much as it hears you.
For a first mic, a large-diaphragm cardioid condenser is the right call. It's sensitive and detailed, captures vocals and acoustic guitar beautifully, and the cardioid pattern rejects sound from behind it - useful in an untreated space. A decent one sits well under $300. Browse the studio microphone range and we'll point you at the workhorses.
- Condenser - detailed and open; needs phantom power; best for a controlled room.
- Dynamic - tougher, less sensitive, ignores room reflections - a smart pick if your space is noisy or live-sounding.
- USB mic - fine for podcasts and demos, but it locks you out of the interface ecosystem; we'd steer a serious starter to XLR.
Spend your first dollars on a good-enough mic and a better room, not a boutique mic and a bathroom. For the full rundown on patterns and types, our microphones guide goes deeper.
Headphones vs monitors for mixing - start closed-back
You need two listening jobs covered: tracking (recording without sound leaking into the mic) and mixing (judging the balance). For both, when you're starting out, a single pair of closed-back headphones is the honest answer.
Closed-back cups seal against your head, so the click and backing track don't bleed into a sensitive condenser while you record. Open-back headphones sound more natural but leak like a sieve, so they're a tracking nightmare. Start closed-back and you cover everything. Shop studio headphones.
Studio monitors - powered near-field speakers - are wonderful, but they're a phase-two purchase. A bad room lies to you through speakers far more than through headphones, so monitors only pay off once you've treated the space. When you're ready, the studio monitors range is the place to look, and a budget of $500-$1,000 buys a serious pair.
- Now - one pair of closed-back headphones for tracking and mixing.
- Later - add open-back headphones or near-field monitors once the room is sorted.
- Always - check your mix on a few different systems (phone, car, earbuds) before you call it done.
Our headphones and monitors guide walks through the open-vs-closed and headphone-vs-speaker decisions in full.
Acoustic treatment - the cheap wins come first
Treatment is not soundproofing. Soundproofing stops sound leaving the room (expensive, structural); treatment stops sound bouncing around inside it (cheap, and it's what makes recordings sound pro). You want treatment.
The good news is the biggest improvements are nearly free. Before you buy a single panel, record in the softest room in the house and kill the reflections you already can.
- Free first - record in a carpeted room with a bed, a couch and curtains. Soft stuff absorbs; hard flat surfaces reflect.
- Hang a doona or duvet behind you and another in front, off to one side, to make a quick vocal booth.
- Then buy panels - a handful of broadband acoustic panels on the wall behind the mic and at the first reflection points does the heavy lifting for well under $300.
- Skip the foam egg-cartons as your main fix - thin foam only tames the harsh high end and does nothing for the boxy lower mids.
If you do most of your work with a microphone, treatment is the best dollar-for-dollar upgrade you can make - bigger than a fancier mic. Come into Footscray and have a chat; we'd rather sell you two panels that fix your room than a mic that can't.
What your budget gets you
Under $500
First-timers who want a complete, no-compromise starter chain.
A 2x2 USB interface, a large-diaphragm condenser, closed-back headphones, an XLR cable and a free DAW. Genuinely release-quality if the room is decent - this is the rig we set up most often.
Shop Audio Interfaces under $500 →$500 - $1,000
Songwriters ready to step up one piece at a time.
Add a better condenser or a second dynamic mic, a few acoustic panels for the room, and a pop filter and proper mic stand. Or bank it toward your first pair of near-field monitors.
Shop Studio $500–$1,000 →$1,000 - $2,000
Producers building a room they'll keep for years.
A treated space with broadband panels, a quality pair of studio monitors, a MIDI controller for programming, and headroom for a 4-input interface if you track more than one source at once.
Shop Studio Monitors $1,000–$2,000 →Around $2,000+
Serious home setups and small project studios.
A multi-input interface, a small mic locker, dedicated outboard or a quality preamp, and full room treatment. At this point the room and your ears matter more than any single box.
Shop Rack & Outboard Gear from $2,000 →Compare at a glance
| Type | Best for | Watch out for | Typical spend |
|---|---|---|---|
| 2x2 USB interface | Solo overdubbing - vocal, guitar, one at a time | Only two simultaneous inputs | Under $400 |
| 4x4 / 8-in interface | Tracking a kit or small band live | Overkill if you record one source at a time | $400 - $1,000 |
| Large-diaphragm condenser | Vocals and acoustic guitar, detailed sound | Hears the room - needs a quiet space + phantom power | Under $300 |
| Dynamic mic | Noisy or live-sounding rooms, loud sources | Less detail; needs more clean gain | Under $250 |
| Closed-back headphones | Tracking and early mixing - no bleed | Less natural soundstage than open-back | Under $300 |
| Near-field monitors | Mixing once the room is treated | Untreated rooms make them lie to you | $500 - $1,000 |
Common mistakes to avoid
- Spending big on the mic, nothing on the room A premium condenser in an echoey, hard-surfaced room sounds worse than a modest one in a soft, quiet space. Fix the room first - it's cheaper and it matters more.
- Recording too hot Cranking the input gain until the meters slam into the red causes digital clipping you can't undo. Aim your loudest peaks around -12 to -6 dBFS and leave yourself headroom.
- Forgetting phantom power Condenser mics need 48V phantom power switched on at the interface. No sound from a brand-new condenser is almost always this - flick the +48V button before you panic.
- Mixing on open-back headphones or laptop speakers Open-back cans leak into the mic while tracking, and laptop speakers hide the bass entirely. Start with one closed-back pair and reference your mix on a few systems.
- Buying more inputs than you'll use An 8-channel interface is wasted money if you only ever overdub one part at a time. Match the input count to how you actually record and put the savings into the mic or room.
Your questions, answered
What's the absolute minimum I need to record at home?
Four things: an audio interface, one microphone, a pair of closed-back headphones, and a DAW (the software). Most interfaces bundle a free DAW, and Reaper, GarageBand and Cakewalk cost nothing. A complete starter chain runs under $600, often closer to $450.
Do I need an audio interface, or can I just use a USB mic?
A USB mic is fine for demos and podcasts, but it plugs straight into your computer and can't be expanded. An interface plus an XLR mic gives you better preamps, room to add a second mic or a guitar, and a far more flexible setup. For a serious start, go interface plus XLR.
How many interface inputs do I actually need?
Count how many sources you record at the same instant, not how many you own. If you overdub one part at a time, a 2-in/2-out interface is perfect and the best value. You only need more inputs to track a drum kit or a full band playing together.
Should I buy a condenser or a dynamic mic first?
For most home recording in a reasonably quiet room, a large-diaphragm condenser is the right first mic - it's detailed and handles vocals and acoustic guitar well. If your room is noisy or echoey, a dynamic mic is more forgiving because it ignores more of the room.
Headphones or studio monitors for mixing?
Start with one pair of closed-back headphones - they cover both tracking and mixing and don't lie to you in an untreated room. Add studio monitors later, once you've treated the space, because bad rooms throw off speakers far more than headphones.
What's the cheapest way to make my recordings sound better?
Treat the room before you upgrade gear. Record in a carpeted room with soft furnishings, hang a doona behind you, then add a few broadband acoustic panels at the first reflection points. It's the best dollar-for-dollar improvement you can make, and it beats a fancier mic.
Do I need a MIDI keyboard to produce?
Not to start, but a MIDI controller makes programming drums, synths and basslines far quicker than drawing notes with a mouse. A compact 25- or 49-key controller is an easy add once your core chain is sorted - see our MIDI controllers and the synths and MIDI guide.
Shop the categories in this guide
Keep reading: Choosing a Microphone · Headphones & Studio Monitors · Synths & MIDI Controllers
Try our in-store range in Footscray
Come and play what we’ve got on the floor side by side — real players on hand, honest advice, and genuine authorised Australian stock with full manufacturer warranty. Call ahead and we’ll check what’s in store for you to try.
Talk to our experts — in-store or on the phone
Still torn between two? Our team are real players who know this gear inside out. Call us, message us, or drop in and play what we’ve got in store. Reserve online for Click & Collect — we’ll confirm it’s ready before you come in — genuine stock, full manufacturer warranty, and your Consumer Law rights always apply.
Visit the Footscray showroom
Why you can trust this advice
Written & reviewed by
The Scarlett Music Team
Footscray showroom & workshop · Independent dealer since 1997
This guide is written by the same team that sells, demos and plays this gear six days a week — so our picks come from hands-on experience with the actual instruments, not a spec sheet. We only recommend genuine, authorised Australian stock, and pricing and availability are reviewed and updated regularly.


Leave a comment